SOCCER DIAGRAMMING
©CoachingAmericanSoccer.com®
Soccer coaches should use diagramming to enhance player understanding through visual learning. This allows them to grasp complex tactical, spatial, and positioning concepts faster than verbal instructions alone.
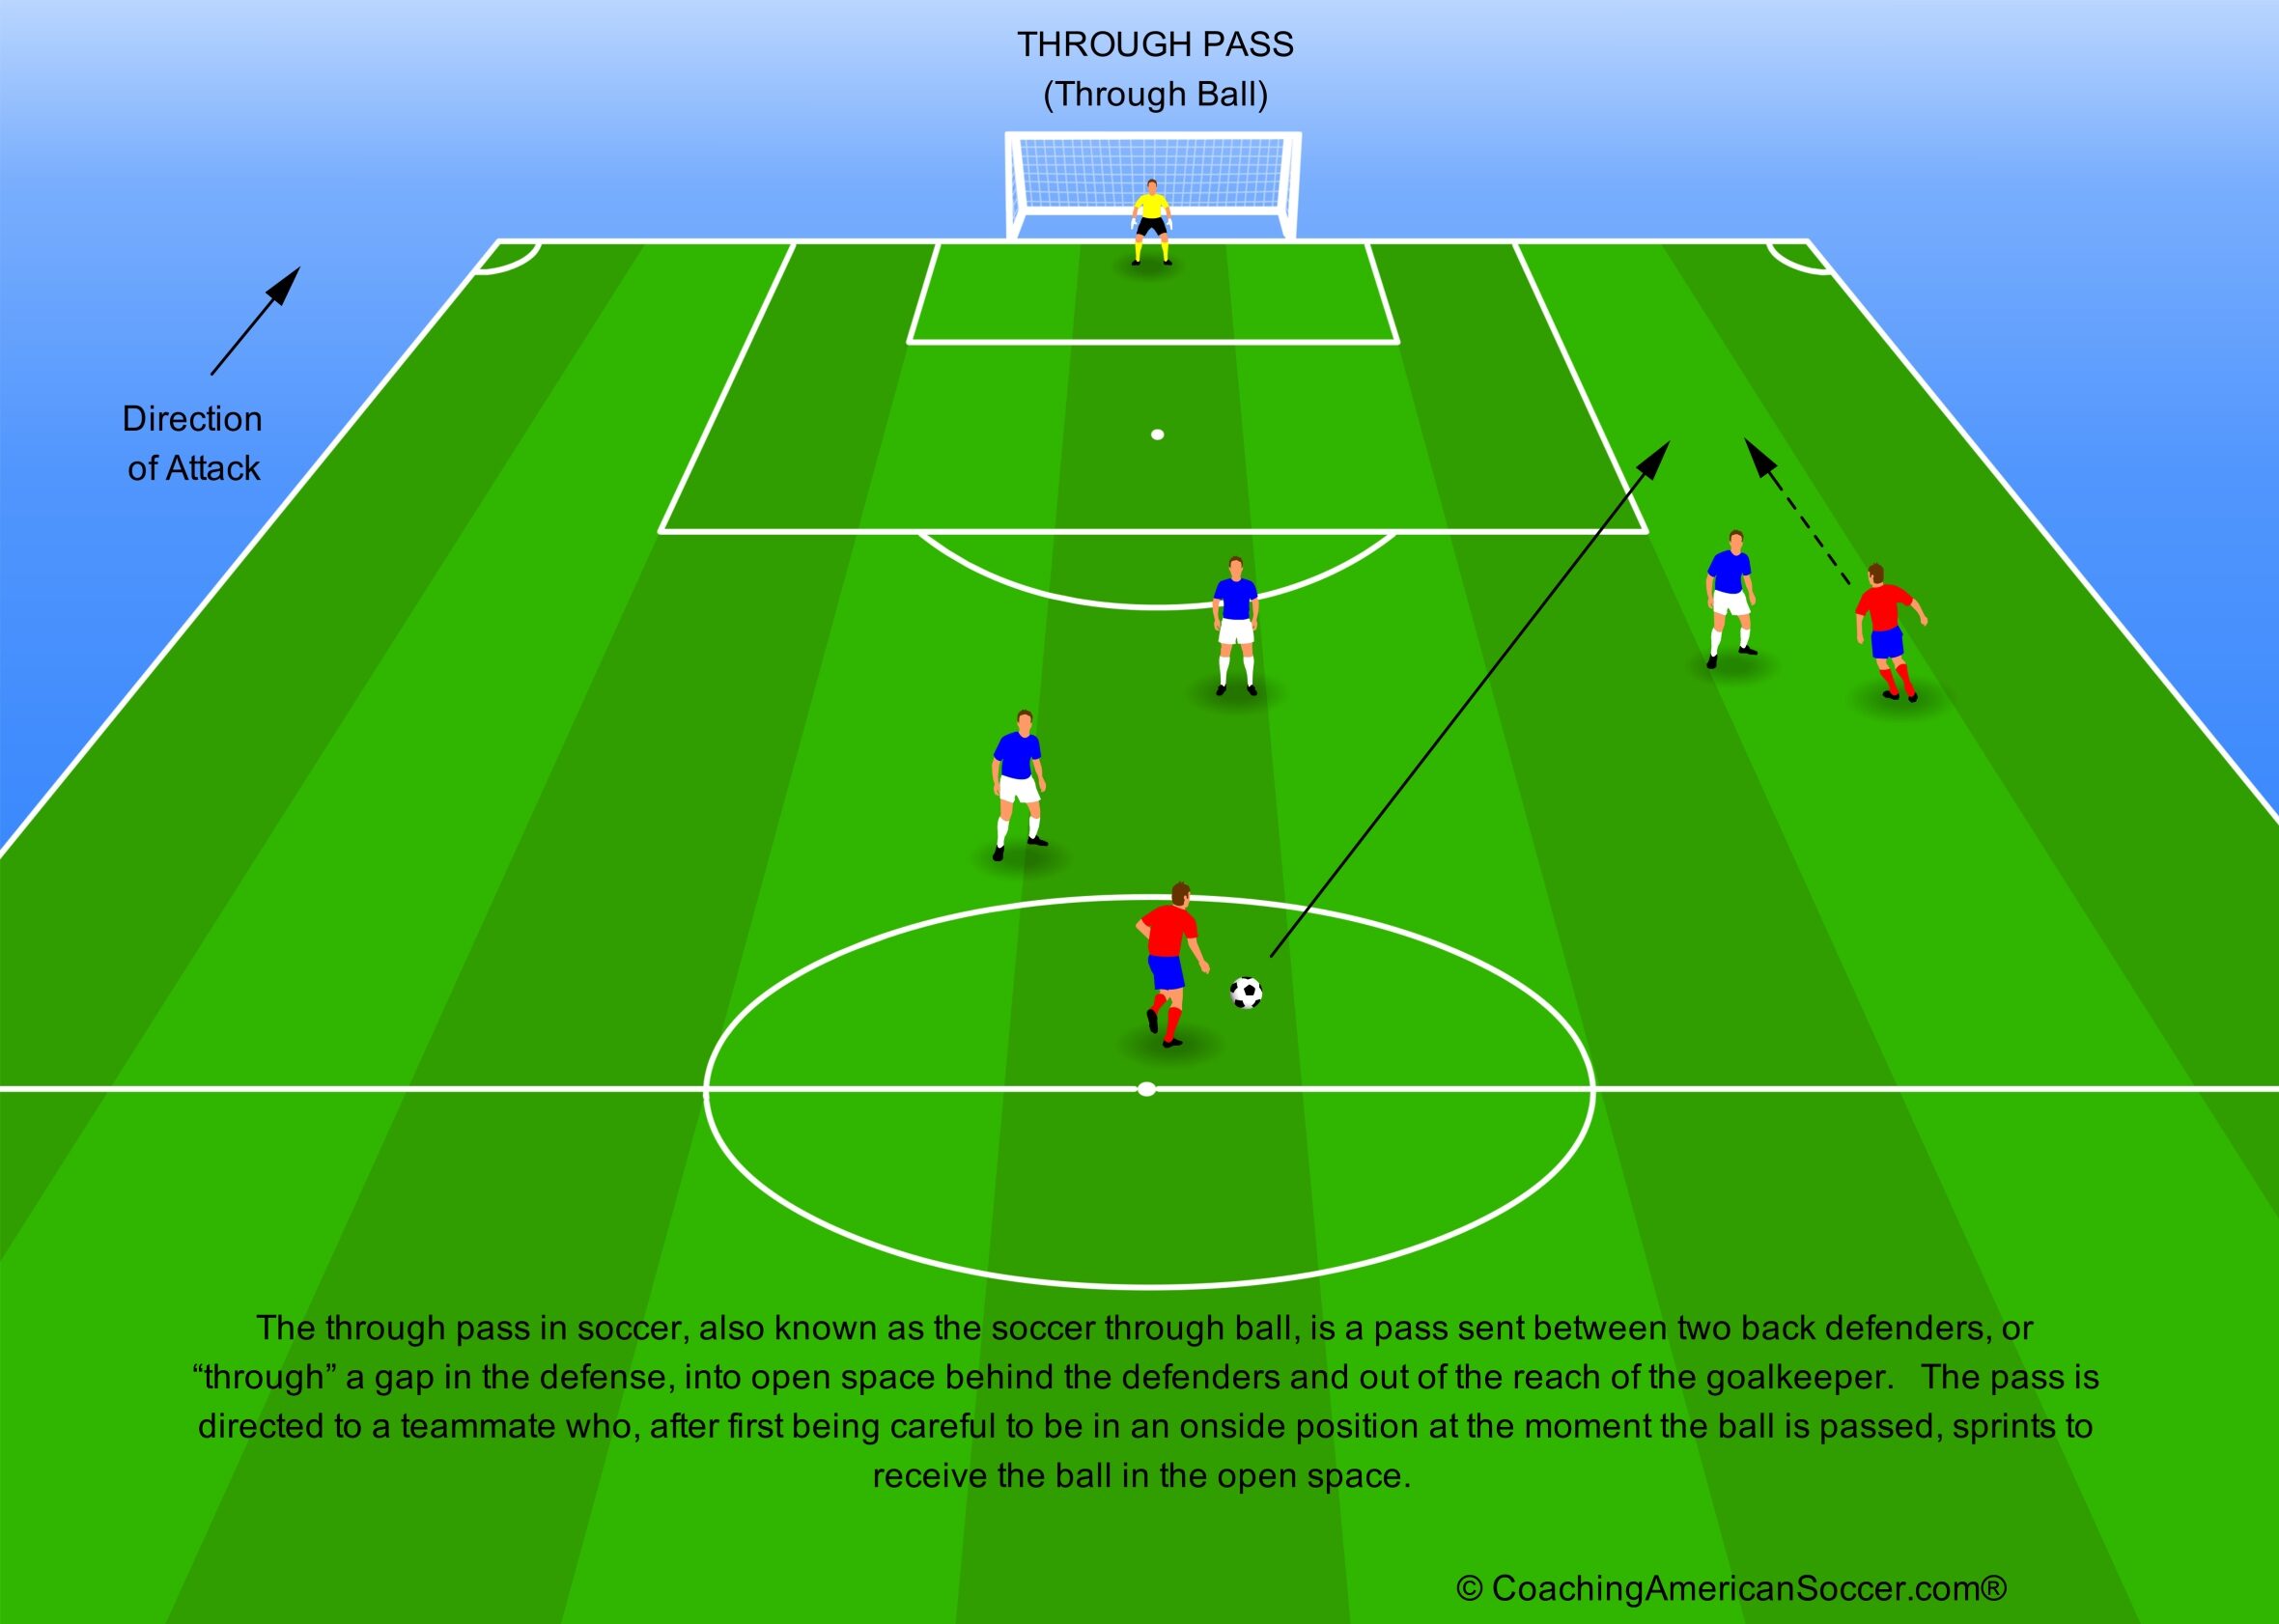
Soccer Through Pass
Key Reasons for Using Diagramming
Combined with literal, on-field, direction and movement, diagrams facilitate clear communication of strategies, set-pieces, and drills, improving team cohesion and increasing cognition.
- Improved Tactical Understanding: Visualizing plays and movement patterns help players identify open spaces and understand their roles within the team’s structure.
- Faster Communication: Coaches can quickly illustrate movement without long explanations, using standardized symbols.
- Enhanced Spatial Awareness: Diagrams teach players to understand distances, angles, and relationships between themselves, teammates, and opponents.
- Pattern Recognition and Mental Rehearsal: Showing players consistent diagrams (“pictures”) helps them recognize game situations faster, reducing errors during play.
- Clearer Drill Setup: During training, diagrams clarify positioning, flow, and objectives, reducing confusion and maximizing time on task.
Effective soccer diagramming uses standardized symbols to illustrate tactics and drills, with teams often shown attacking “up” the field (bottom to top). Key elements include solid lines for passes, dashed lines for player movement, and zigzag lines for dribbling.
Usual Field Layout for a Soccer Diagram
Diagramming starts with a proper depiction of the soccer field itself. This can be on a simple piece of paper, on a whiteboard, on a magnetic board, or included as the starting point in a computer or mobile app. This should include:
- Orientation: Diagrams are generally drawn in portrait mode (“south-to-north” or “vertical”), with one goal at the bottom and the other goal at the top.
- Boundaries: Sidelines (touchlines) and end lines (goal lines) establish the perimeter of the field.
- Halfway Line and Center Circle: Divides the field into two equal halves. Add the center circle (and kickoff mark).
- Penalty Areas: The “18-yard box,” as proportionate as possible.
- Goal Areas: The “6-yard box,” as proportionate as possible.
- Corner Arcs: A quarter circle at each corner.
- Penalty Marks: Marked equally from the midpoint between the goalposts to a point that doubles the outer line of the goal area into the penalty area.
- Penalty Arcs: An arc drawn outside the penalty area approximating a proportionate 10-yard radius from the penalty marks.
- Goals: Do not have to be elaborate, just easily identifiable as proportionate 8-yard marks in the proper location.
The basic layout of the field diagram does not have to be perfectly proportionate, as long the details are correctly relative.
See an example: Soccer Field for Diagramming
Common Soccer Diagramming Conventions
Generic soccer diagramming uses commonly-recognized conventions to communicate tactics. Key conventions include solid lines for passes, dashed lines for player movement without the ball, and wavy/serpentine lines for dribbling.
Team and player designations vary depending on the medium of the field layout. This can range from “X-s” and “O-s” on a piece of white paper, to colored circles, triangles or squares on a magnetic board, to depictions of players with different-colored jerseys on computer apps. Portrait-oriented field diagrams usually show the attacking team moving from bottom-to-top against the opposition defending the goal at the top.
- Team Orientation: Teams typically attack toward the top of a portrait-mode diagram and defend at the bottom. (Landscape-mode or horizontal diagrams, “west-to-east,” tend to have the attacking team moving from left-to-right.)
- Directionality: It is usually useful to add a line (preferably outside of a touchline) with an arrowhead indicating the direction of attack for your team.
- Team Colors or Shapes: Your team is represented by one color or shape and the opposing team by a different color or shape. Different jersey colors are associated with apps that use figures of players. Goalkeepers are often denoted with a different color or shape from the field players.
- Field Players: Individuals are often depicted by circles or triangles. Apps may show actual profiles showing specific actions and able to face in different directions. (If “X-s” and “O-s” are used, “O-s” generally denote Offensive players.)
- Goalkeepers: When color is used, keepers are usually denoted as yellow to distinguish them from field players. Although green has been suggested, it tends to blend into a green-colored field surface.
- Movement Indicators:
- Solid Lines: Passes, shots or the flight of the ball.
- Dashed Lines: Player movement off the ball, including runs or positioning.
- Wavy/Serpentine Lines: Player dribbling with the ball.
- Length of Lines: Locations, direction and distances are shown from the start of the lines to the end of the lines.
- Arrow Heads: Arrow heads are placed at the ends of lines to show the direction of a ball or the path of a player, including an estimated end point.
- Curved Lines: Curved, dashed lines can represent player movement, such as bending runs, while curved, solid lines can represent ball trajectory, for passes or shots that bend or for an airborne ball such as a chip.
- Positions/Numbers: Players are often labeled with numbers, based on the US Soccer numbering system (e.g., #1 for a Goalkeeper, #9 for a Striker), or with position names or abbreviations (e.g., Right Wing/RW) or Left Full Back/LFB).
- Ball: The ball must clearly be shown. This is usually a depiction of the traditional black-and-white ball and is often located at the start of a solid or wavy line.
- Corner Posts: These are essentially optional because they don’t really add to the function of most diagrams.
- Other Equipment: Diagrams showing drills may also depict cones, saucers, disks, coaching stakes, agility ladders, or other coaching equipment.
Whichever conventions are selected, they must be used consistently across all diagrams presented to a team in order to avoid confusion.
Components of a Good Diagram
A good diagram is a clear, concise, and accurate visual representation of information, designed to make complex concepts, relationships, or processes easy to understand at a glance. This is no different for a soccer diagram. It acts as a “visual translator” that highlights essential meaning while minimizing irrelevant details.
- Title: A clear, short title explains what the diagram represents.
- Clear Objectives: The diagram should clearly show the goal of a tactic or a drill (e.g., How to Make a Through Pass).
- Accurate Representation: Use proper field dimensions and markings (e.g., the penalty areas, center circles).
- Minimal Text: A good diagram should be largely self-explanatory without needing long written explanations, especially at the youth levels.
- Visual Elements: Properly sized shapes and lines that show relationships. Effective use of color draws the eye to the most important elements first.
- Labeling: Concise, clearly placed labels for all essential parts.
- Detail-Oriented: For drills, include details like cones, disks, balls, and the coach’s location.
- Simple, uncomplicated: Avoid clutter, using only necessary elements to convey the message.
- Consistent Styling: Use consistent, standard shapes, fonts, and colors, often with a legend for guidance.
- Age appropriate: It is tailored to its specific audience and purpose, balancing detail with accessibility to young learners.
- Language Formatting: The overall narrative follows natural English reading patterns (e.g., top-to-bottom and left-to-right).
For youth, break down complicated information into component parts. Use sequential diagram presentations (showing steps in order) rather than presenting complex plays all at once to help players process and retain information better.
Common Diagramming Aids
Soccer diagramming aids include mobile apps, online tools, and physical notebooks that help coaches plan drills, create tactical diagrams, and organize training sessions. Key digital tools allow coaches to draw, animate, and electronically share tactics. Physical aids like dry-erase boards and magnetic boards are beneficial for on-field training.
Digital Soccer Diagramming Aids
Many commercial digital products are available. Some are free while others require purchase or subscriptions. For the products below, no order or recommendation is implied.
- Tactics Manager from SoccerTutor.com – https://www.soccertutor.com/pages/tactics-manager
- Easy Sports Software – https://easysportssoftware.com/en/
- Planet Training – https://planet.training/soccer-app
- MOJO Sport – https://mojo.sport/get-the-app-flag/
- Soccer Blueprint – https://soccerblueprint.com/
- Coach Tactic Board – (Available on iOS and Android) https://apps.apple.com/us/app/coach-tactic-board-soccer/id834813357
- Soccer Drive – https://www.soccerdrive.com/draw
- Academy Soccer Coach – https://academysoccercoach.co.uk/
- TacticalPad – https://www.tacticalpad.com/en-us/new/index.php
- Soccer Drills Designer – https://www.sportplan.net/drills/Soccer/Soccer-Drill-Designer.jsp
Physical Diagramming Aids
Other coaching aids include dry-erase boards and magnetic boards, which may come in different sizes. Dry-erase boards tend to be the most useful on-field, especially during games. With magnetic boards it is very easy to lose pieces.
Soccer Coaching Tips:
- Sample: https://www.youtube.com/playlist?list=PLaCgx2Kux_tz8jhmNO8tVsABztaFjrhQu
- Establish a team playbook from the diagrams created.
- US Soccer has attempted to set up their own version of Diagramming Standards and a mobile app.
© John C. Harves