INTRODUCTION TO SOCCER HEADING
(Standing Headers)
© CoachingAmericanSoccer.com®
One of the more dramatic and challenging skills in soccer is “heading.” It is a skill that requires great determination, balance and timing. When introduced properly and performed correctly, at this time it has not been found to be inherently dangerous and can actually be fun. There is serious and important debate, however, regarding the techniques and the appropriate age at which to introduce heading to young players in order to ensure the highest degree of safety to developing bodies. A minimal number of properly-performed scientific studies have been done in this regard, but no definitive conclusions appear to be available at this time. Heading is truly unique to soccer and helps make the game most appealing. Accordingly, heading must be taught and taught well.
Initial Guidance
– No players 10 years of age and under should be heading, especially standard, fully-inflated soccer balls. “Local Rules” may prohibit “underage heading” in games. 11-, 12-, and 13-year-olds should only engage in limited heading. A series of soft balls may be used to introduce heading at first and then standard soccer balls used; the size of the soccer ball should still be age appropriate.
– Parents, siblings, and other players must be clearly instructed to NOT take it upon themselves to introduce heading to small children.
– No one is to ever throw a ball at a child’s head.
– Players are not to try to throw a ball up into the air to attempt heading it themselves (“self toss”). This rarely works. It develops improper technique because of an inappropriate flight of the ball, and players routinely and incorrectly strike the ball with the top of their head.
– No young player is to be forced to head a ball; heading is an “unnatural” act and children who are reluctant to head at first do so from a normal protective instinct.
– No teammates should ever be allowed to ridicule a player who is reluctant to head.
– Young players must not hit the ball with the top or side of the head.
Objective for Beginning Heading
Since the ball often becomes airborne in soccer, but field players are not allowed to grab it with their hands, it soon becomes apparent that the ability to control or redirect the flight of the ball by hitting it with the head is a very important skill. This is significant because the player who can head properly will get to the ball first, before a player who is trying to control the ball with his chest or who is waiting for the ball to come down to the ground, and this means obtaining or retaining possession for the team. In addition, many goals are scored or saved as a result of properly-executed headers.
Limit the Number of Headers
In US youth soccer, heading rules vary by age group to minimize concussion risks. For players 10 and under, heading is banned in both practices and games. For players aged 11-13, heading is limited to 30 minutes total per week in practice, with a maximum of 15-20 headers per player, per week. There are no restrictions on heading in games for this age group. Players 14 and older have no restrictions on heading.
Points of Emphasis
The first, and probably most important point to remember when first learning to head, is that the player must forcefully go to meet and dynamically strike the ball with their head. The player must not let the ball arrive and hit them in the head. In order to do this, the eyes must be kept open during the entire performance of the skill so that proper timing may be achieved to strike the ball. It is quite natural to involuntarily close the eyes or blink when the ball is struck, but this natural tendency needs to be overcome by mental concentration. The mouth is to already be closed at the moment of contact.
The second point when first learning to head is that the center of the ball (middle of the “equator”) is to be struck by the center of the player’s forehead at the point where the roots of the natural hairline meet the scalp. The force used to strike the ball is obtained by bending forward from the waist and snapping the head and neck forward. In order to create this force, before the ball arrives the body must first be properly balanced, with the weight evenly distributed on the balls of the feet (generally with one foot ahead of the other) and the arms slightly outstretched. Also, the torso must be bent backward from the waist and, further, the chin must be pulled in and the head pulled backward from the neck. Additional force may be obtained by having the elbows bent at a 90-degree angle and positioned out in front of the body. At the time the ball is struck, the elbows are thrust backward.
In summary, to initially learn to head a soccer ball, the player should:
1. Before the ball arrives, keep the eyes open and the mouth closed.
2. Obtain proper balance.
3. Simultaneously bend backward at the waist and pull the head and chin back at the neck. (Elbows and forearms forward.)
4. As the ball arrives, remember to aggressively strike the ball and not let the ball hit them.
5. Simultaneously bend forward from the waist and snap the head and chin forward from the neck. (Elbows and forearms thrust backward.)
6. Contact the center of the ball with the center of the forehead at the base of the natural hairline.
When performed properly, heading the ball should not hurt. This is because nature has provided thicker bone in the skull at the forehead to protect the brain from injury when falling forward. If heading does hurt, it is likely that it is being performed improperly or possibly that a physical condition may exist which needs to be explored. On the outside chance that a player complains of a headache, dizziness, sensitivity to light, or blurred vision, heading must be stopped immediately (see Concussions). (Beginning heading of a real soccer ball, or resumption of heading after a long period of inactivity, may cause the skin of the forehead to become tender. This is normal. With continued training, the skin should toughen and the tenderness should go away.)
To get to the point where the objective of beginning heading can be achieved, coaches may use the following ball progression:
Balloon
Sponge Ball (partially reticulated polyurethane foam; NERF™-type material) or Small Beach Ball
Playball – The soft-feel, air-filled ball, approximately the diameter of a standard Size 5 soccer ball, made of pliable plastic, which is usually sold from big bins in grocery, drug, and toy stores during the summer (see photo).

Playball for Heading ©CoachingAmericanSoccer.com®
Volleyball
Partially-deflated soccer ball
Properly-inflated soccer ball
Hanging soccer ball (“training” ball”) on a rope (or a tetherball) (see photo below)
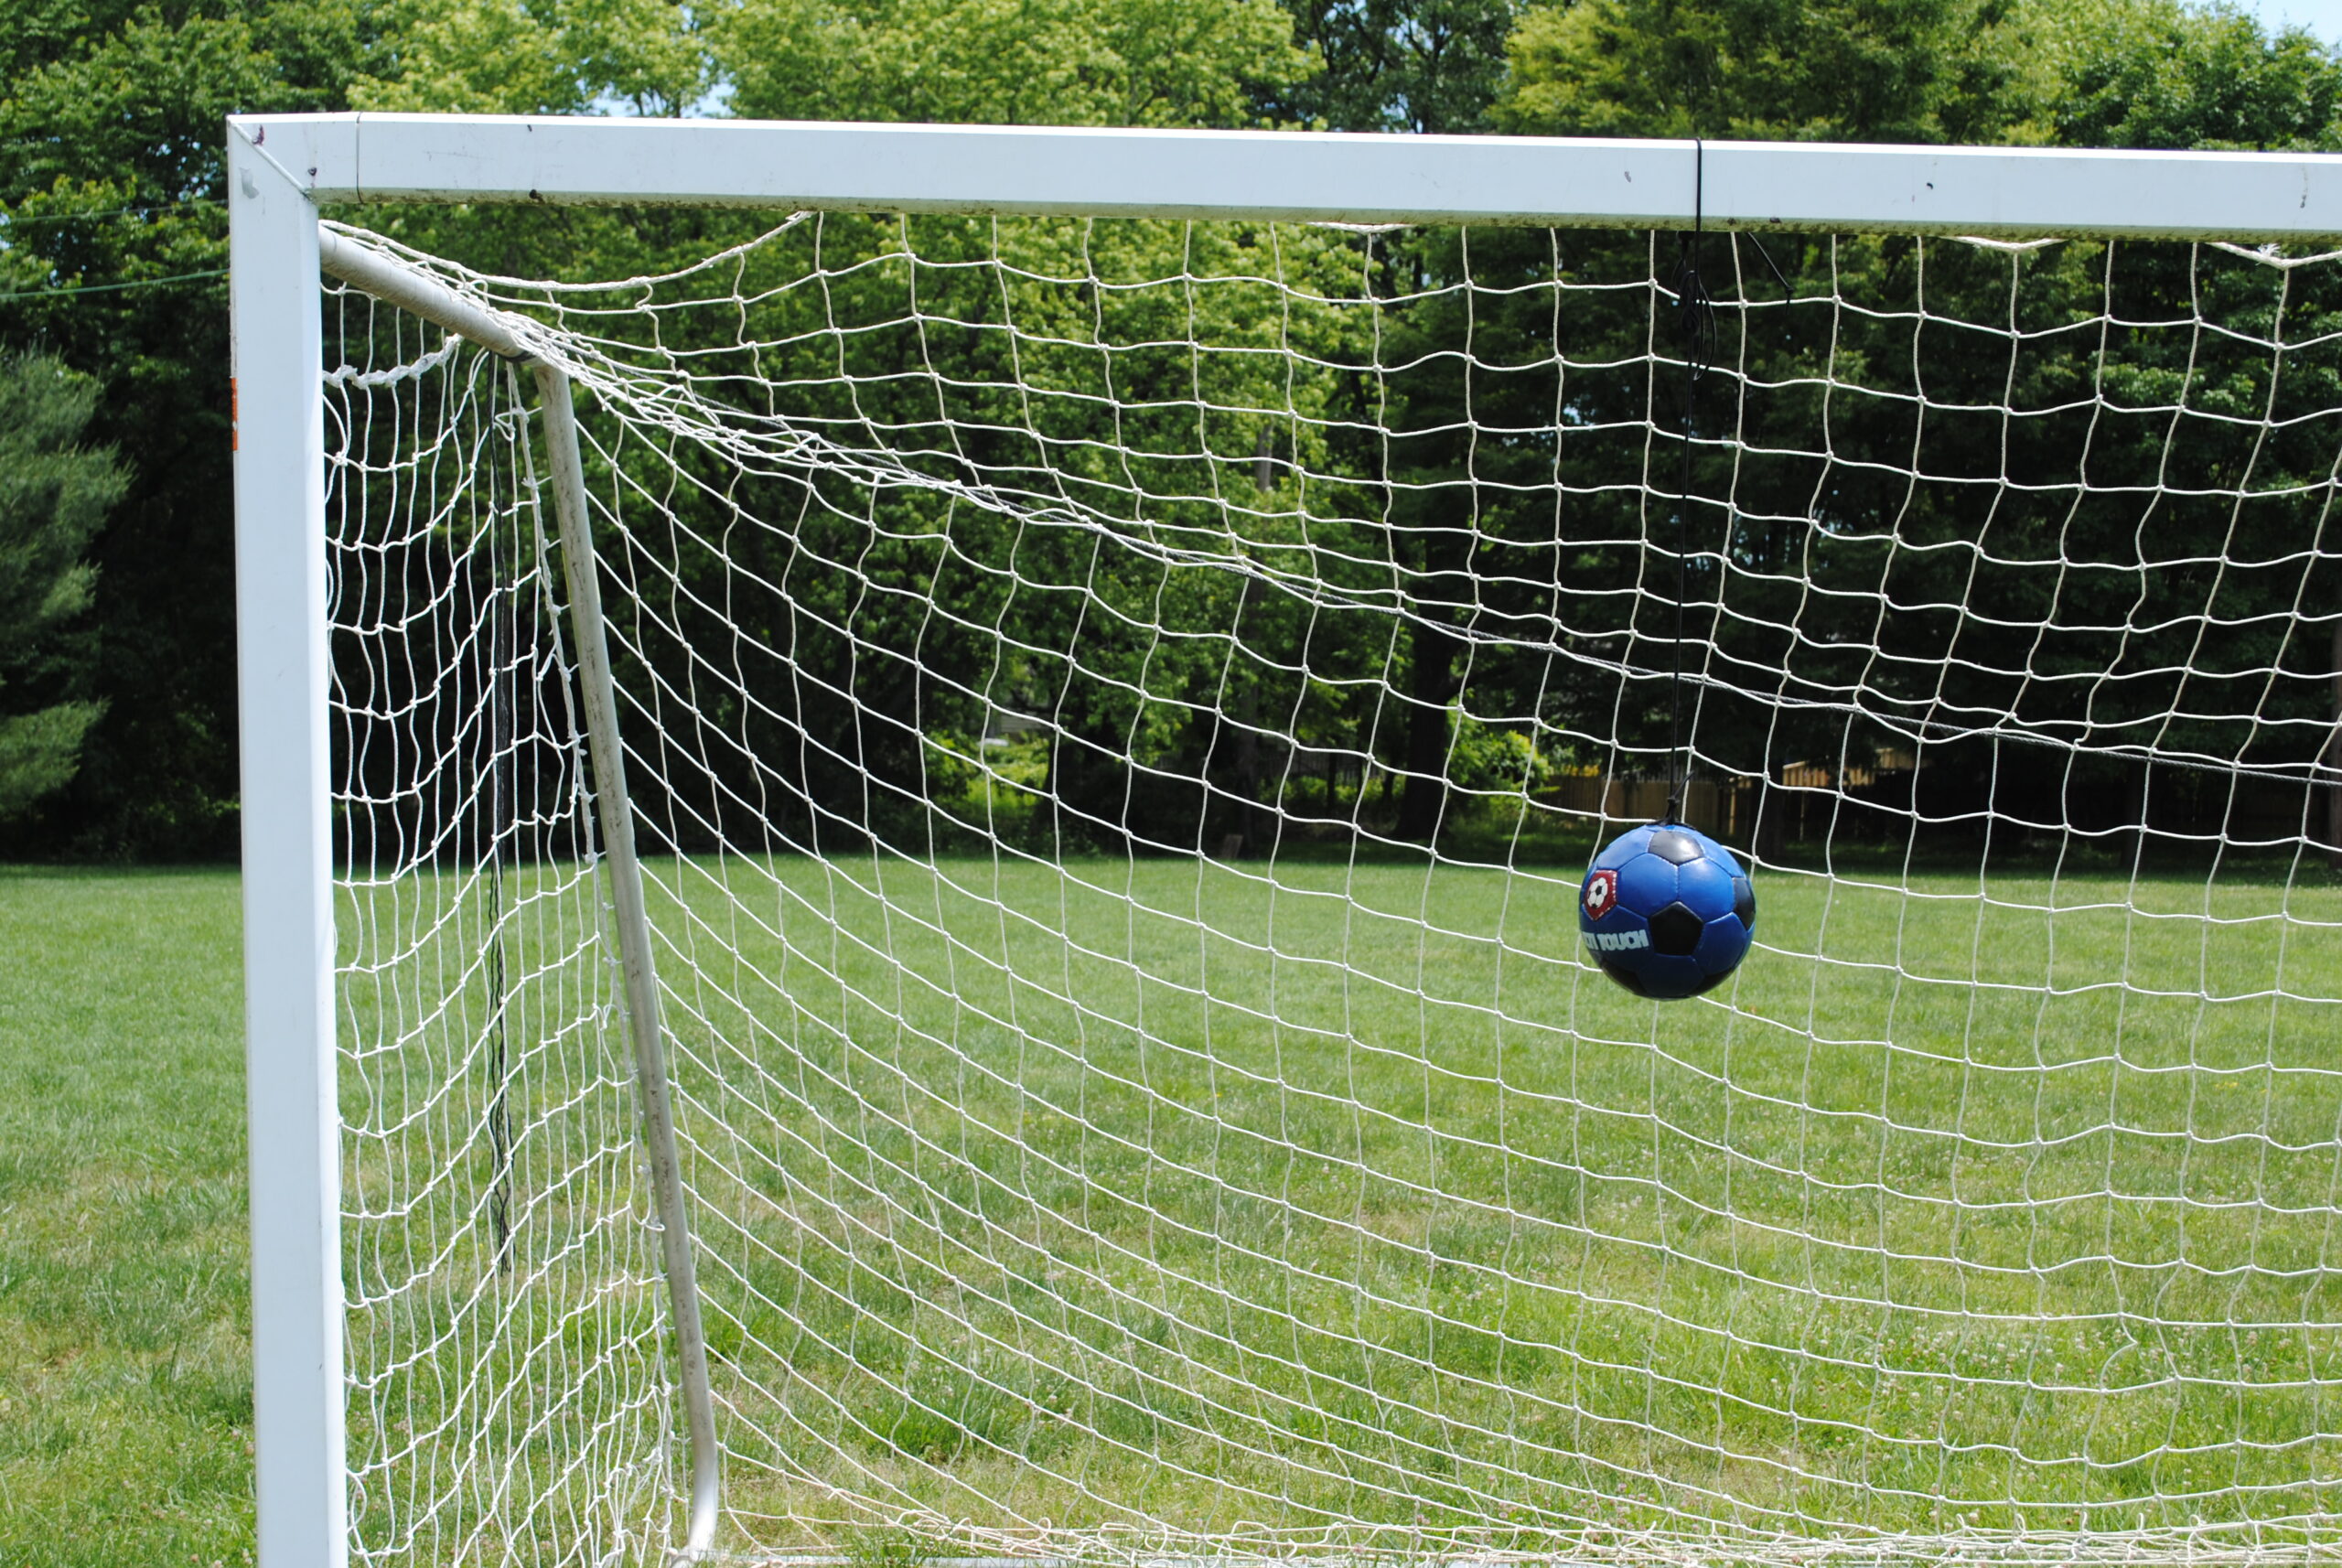
Hanging Soccer Ball for Heading ©CoachingAmericanSoccer.com®
The following instructional progression for soccer heading is suggested:
1. Coaches With Individual Players
– Introduce and demonstrate the ultimate objective as a “standing header.”
– Tap the ball #1: (Player standing.) Coach holds the ball with both hands (on the sides of the ball) at the proper point in space, approximately 4-inches from the player’s forehead, so that when the player nods his head into the ball, he will contact the proper point on the ball with the correct part of the forehead. The player is instructed to keep his eyes open and mouth closed while he looks at the ball and then nods into the ball a number of times (“tap, tap, tap…”).
– Knock the ball off: (Player standing.) Coach (at 90 degrees to player) holds the ball on the flat palm of the hand at the proper point in space, approximately four inches from the player’s forehead, so that when the player nods into the ball, the player will knock the ball away. (Coach needs a number of balls and a retriever.)
– Waist bend: (Player on knees.) With player’s torso perpendicular to the ground, coach holds ball with both hands at the proper point in space, approximately four inches from the player’s forehead. Player is instructed to bend backward from the waist and pull the chin in. Player is then to bend forward from the waist and nod into the ball; repeat. Options: player sitting with legs outstretched in a “V”-shape; player sitting on heels.
– Standing position: With the player’s torso perpendicular to the ground, feet shoulder-width apart, left foot slightly ahead for a right-handed player (and vice versa) for balance (“stride position”), coach holds ball with both hands at the proper point in space, approximately four inches from the player’s forehead. The player is instructed to bend back from waist as in the exercise above and then bend forward to contact the ball.
– Coach acts as server: With the minimum force necessary to toss the ball to the right position in space, the coach delivers a two-handed, underhand, only slightly-arcing ball from approximately three feet away. For a young learner, the right position in space is approximately 4-inches directly in front of the player’s forehead. The player is instructed to try to head the ball back to the coach’s waist.
2. Individual Player with a Ball (1-player, 1-ball)
– Tap the ball #2: (Player standing.) Upon recognizing that the player is contacting the ball properly, the player may hold the ball himself with both hands (on the sides of the ball) and nod into it (“tap, tap, tap…”). Players are to be instructed to hold the ball in one place out in front of them in space, elbows bent, and to nod into it, not to pull the ball into their forehead.
– Now without the ball, stand with arms at shoulder height straight in front of the body, and legs in stride position. Pull the head back as far as possible with the chin to the chest. Do not throw the head back – the chin must stay down. Take a small step with the front foot, bringing the head forward and the arms back, while at the same time bending the elbows until the hands are even with the head.
– Now pick up the ball again, and repeat the ball tap using the modified approach above: Tap the ball gently with the forehead, always keeping the eyes wide open.
3. Pairs with a Ball (2-players, 1-ball)
In pairs, one player acts as a “server” and the other player heads the ball. It is critical that, before performing heading drills with teammates as servers, the servers be taught the proper technique of how to serve the ball. This is the same technique as that described above, used above by the coach when performing individual instruction. Coaches must correct servers on the proper technique as drills are being performed, in addition to correcting heading technique.
– Gentle toss from server: (With the minimum force necessary to toss the ball to the right position in space, the server delivers a two-handed, underhand, only slightly-arcing ball from approximately three feet away. For a young learner, the right position in space is approximately 4-inches directly in front of the player’s forehead. The header is instructed to try to head the ball back to the server’s waist. After five attempts, switch positions of server and header and repeat.
– Increasing distance from server: Action as above. Server moves back in one-foot increments until reaching approximately six feet away, only if success is being achieved and the header agrees. It is extremely important that the server only applies the minimum amount of arc and force to the flight of the ball upon delivery. The header should add the arm thrust.
Optional Drill #1: After players are used to a server, coaches may return to the waist-bend activity and utilize a server moving from three-feet to six-feet back in order to emphasize the use of the torso. This may also be done from a sitting position.
Optional Drill #2: Coaches may demonstrate twisting at the waist in order to direct the ball to one side.
Optional Drill #3: Players try to head the ball back-and-forth to each other. With success, players may try to count how many times they are successful.
4. Trio with a Ball (3-players, 1-ball)
Players stand in groups of three in a triangle 4-8 yards apart, using a single ball. To learn the progression, Player #1 serves to player #2. Player #2 heads the ball to the waist of player #3 by turning at the waist. Player #3 catches the ball and serves it to Player #1. Perform at least three rotations and then change directions.
Same as above, but Player #1 tosses the ball to Player #2 who heads it to Player #3’s head who heads it to Player #1 and so-forth. An attempt is made to keep the ball going for as many rotations as possible without it hitting the ground. Players may count the number of headers or number of rotations. Change directions occasionally.
5. Attacking Headers
Heading down to the goal line to score: Coaches may introduce directing the ball down to the goal-line for shooting purposes (“offensive headers” or “attacking headers”). In front of a goal, from a standing position, players may head a served ball down to the goal line and bounce it into the net. The contact with the ball should be slightly above the midline.
6. Defensive Headers
Heading up and away from goal to clear: Coaches may introduce directing the ball up, out, long, and wide for clearance purposes (“defensive headers”). From a standing position facing away from out in front of a goal post, players may head a served ball away from goal. By adding an additional player, headers may be directed over the server to the additional player, or to the feet of the additional player standing off to the side of the server at approximately a 45-degree angle to the heading player. The contact with the ball should be slightly below the midline.
Other fun activities with which to introduce heading to young players include:
– Players may butt the ball with their foreheads while on all fours to move it around the field (“Mowing the Grass”).
– Players may be on all fours and try to gently tap a stationary ball into the ground from above with their forehead (“Hammer and Nail”).
– Players (of the same height), in pairs, may try to hold the ball stationary between their foreheads (“St. Louis Arch”). Added fun may be gained by suggesting that a.) both players ever-so-slowly inch their way backward to see how far apart they can get before the ball drops; or, b.) one player moves forward while the other player moves backward; or, c.) both players may walk sideways.
Soccer Coaching Tips:
- Players must be instructed to tell the coach immediately if any of the following occurs when heading: headache, dizziness, sensitivity to light, or blurred vision.
- As a significant challenge, players in pairs sitting facing each other may try to head the ball back-and-forth.
- Remember: No individual players should engage in “Self Toss” for heading. When young players try to toss the ball up into the air for themselves to head, the trajectory of the ball is inappropriate and the players tend to incorrectly hit the ball with the top of their head.
- See Jump Heading for the next article in the heading series.
- See Introduction to Juggling for the head juggle.
© Copyright, John C. Harves